Sight Word Games For the Early Reader in Your Life

With my oldest in kindergarten this year, sight words have become a big part of our daily life. She’s practicing them at school and then we have a list at home that we can work on as well. And as I’ve written time and time again, “Play is a child’s work.” So we don’t just buzz through sight word flashcards as fast as we can, we use sight words in our play. Here are a few games we’ve come up with together to help along the way. 

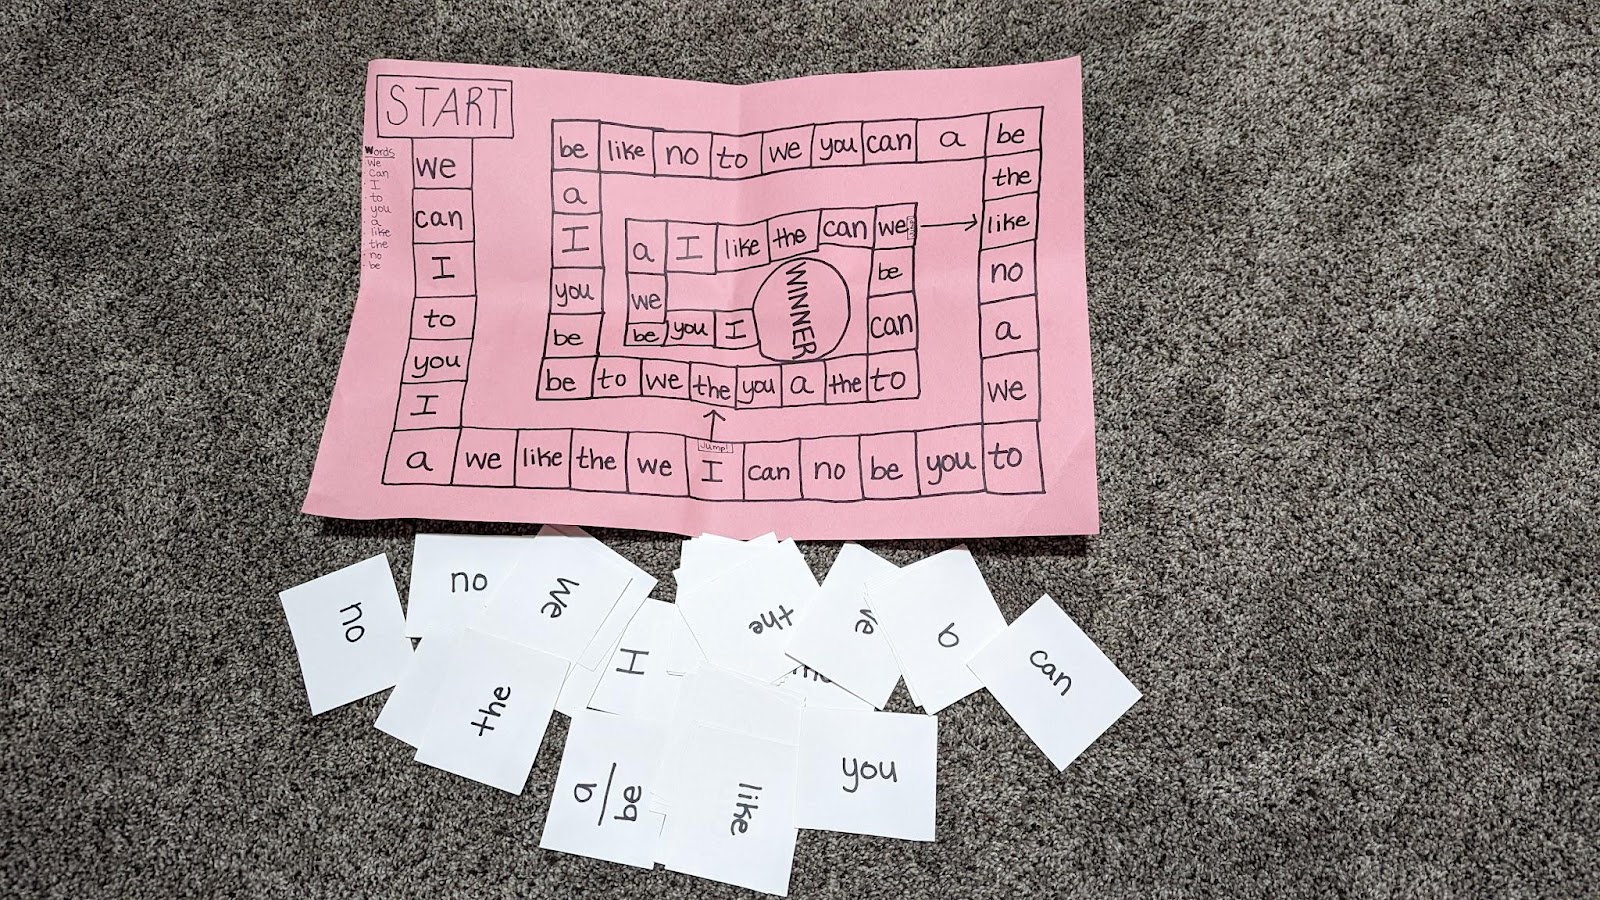
Sight word board game: My daughter and I made this game together in a similar way to how you would play Candyland. There are two ways you can play it- make your own cards with sight words written on them to indicate where your next square is. Or, roll the dice, move forward that many spaces, and read the words as you move. For pieces, we use Bingo tokens, various board game pieces, or small toys. Yes, Skye and Chase help us play this game! If you know, you know!

Sight word Jenga: We bought a few of these tiny tumbling tower sets from Dollar Tree and wrote various sight words on them. Once we pull a brick out, we read the word, and once the tower has tumbled, we take turns making sentences with the words we pulled. We did multiple sets so we could add in more sight words as they learn them in class. I plan to do CVC and CVC-e words someday when she’s ready for that. 

Sight word sentence builder: I bought a pack of sight word flash cards for cheap on Amazon to save me the time and effort of making my own. We use these cards, plus a few index cards with words we decide to add, to create fun sentences. We also use our Jenga blocks for this as well! This one is my daughter’s favorite way to play with sight words! 

Sight word seek and find: For this, we use our sight word flashcards, or sometimes I’ll write them out on sticky notes and use those instead. One of us hides the sight words and then the other one finds them while reading out which word they found. Pictured here is your classic “hide it in the Christmas tree” move. The amount of random toys I pull out of our Christmas tree at the end of the holiday from various hide-and-seek games is unreal!

Sight word seek and find + builder: This game is a two-part game! I place sticky notes with letters throughout our family room, then she is required to find the letters and build the sight words out of the letters. This one took some scaffolding. In the beginning, it was just a letter here or there omitted in sight words that she had to find, but as she got better and better at it, she started spelling her own words with less prompting. 

Sight word hopscotch: This one can be as intricate or as easy as your time and energy allow. We’ve done this quickly outside with sidewalk chalk, quickly inside with our flashcards, or intricately with painter’s tape boxes taped out on the floor or full sheets of paper with the words written on them taped to the floor. SO many different ways to do this one! While jumping from square to square, we read the words. 

Sight word beanbag toss: This one is a simple one we like to do in addition to the other games we’ve been playing. I simply just lay the flashcards out on the floor and my daughter takes a beanbag (or a soft toy, stuffed animal, etc.), tosses it at a card, and if it’s touching the card she reads the word, then she is handed the card. If she doesn’t read the word correctly, she tries again!


Not only are these sight word games building awareness of words, but they are also utilizing fine and gross motor skills, moving around the room, and using, deconstructing, and building these words in ways they haven’t before. Learning sight words isn’t reading. It’s memorizing. And play is a child’s work, so in order to work through memorizing these words, they must play. 

What sight word games would you add to this list? 

Early Childhood Activity Supply List

Probably my most requested blog post, finally put together for you! A grand list of my early ed activities must-have items. Nothing on this list to too special and majority of the items you will probably find around your house already! To see more tips on early childhood activities, visit this page here. This list is a good starting point if you want to be in a position to be able to just grab and go for activities. Nothing on this list is sponsored or endorsed, just a list from one Early Childhood Educator to another. 


Paper/Sticker Supplies

Construction paper

Colored paper

Cardstock

Dot stickers


Paint Supplies

Washable tempera paint

Washable watercolor paint

Rags for cleaning

Paintbrushes- I like the chunkier, bigger kind. Not just the small ones that come with kid’s watercolor kits. 


Office Supplies

Crayons

Markers

Permanent Markers- For you, not the kids! 

Kid scissors 

Pipe Cleaners

Glue

Glue sticks

Painters tape

Sticky notes


Sensory Bin Supplies 

Large storage bin- roughly 28 qt

Small storage bin- roughly 6 qt

Sensory bin fillers: A lot of these are materials I have around my house or material I buy for a specific sensory bin I have in mind. I do not keep all of these materials on hand at all times. 

Funnels

Small people or animals for pretend play

Bowls

Spoons

Ice cube trays

Muffin tin

Pompoms 


Misc

Toothpicks 

Popsicle Sticks 

Food coloring 

Dollar store or IKEA scrub brushes

Shoelaces 

Colored beads

Squirt bottle


With this list of supplies that I have on hand, I can pull out an activity usually within a moments notice and only takes about a minute or two for me to set them up, I’m all about the easy, simple activities! If there is something specific I want to do with my kids I will make a trip to the store for those items. 

Are there any other must-have items you keep on hand? 

There’s More To Preschool Than Learning Letters & Numbers

I’ve had a lot of conversations with friends lately about their preschool-aged kids and how the majority of preschool teachers are very focused on learning letters. They assign homework or make comments like, “Maybe work with your student on their letters at home, he seems to not be picking them up as fast as other kids.” 

WHY.

Why are we so focused on kids learning letters and reading so early? Why are we adding to the stress and pressure moms feel? Why do we feel like walking away from preschool with every single letter memorized is our end goal here? 

Let’s talk about other skills kids learn and walk away with from preschool that is even more important than letters and numbers. 

  • Social skills- working with other children in play and at learning stations. 
  • Language skills- walking away from school talking better and easier to understand. 
  • Coping skills- how to handle emotions when mom and dad leave or someone takes a toy they wanted. 
  • Responsibility with sensory bins, play dough, paint, toys, and other items. 
  • Fine motor development- working through fine motor activities such as stickers or fingerpaint so later in life, they can do things like…. Hold a pencil. 
  • Gross motor development- jumping and skipping and throwing. 
  • Gaining a love and appreciation for literature.
  • Spatial awareness. 
  • How to open snacks independently. 
  • How to prepare food.
  • How to advocate for themselves. 
  • How to communicate needs and wants. 
  • Empathy and sympathy. 

There is a list of OVER TEN things that preschool-age students walk away with that are essential to the future of their education, yet we are still focusing on learning letters and numbers. Yes, learning letters and numbers are important and we should focus on them as well! But it shouldn’t be our only spotlight. Play is a child’s work, it’s how they learn and grow. If we are giving them adequate time to play and interact with peers and adults, that’s what they need more than anything.  

Please stop adding to the stress of parents and students by shoving numbers and letters down their throats! Please celebrate all of the accomplishments your child is achieving during preschool! 

Other helpful articles: 

Other Activities To Do Instead of Explicitly Teaching Letters

What is Play-Based Learning?

Reading Before Kindergarten

Kindergarten Prep Frenzy

What I’ve Learned Teaching Preschool 

A Whole Page of Early Ed Resources

Starting Up Preschool Activities: Your Guide To Getting Started

If you’re here you need some direction on how to start up sensory bins and other activities for the early childhood age! So before we begin, I want to share with you a whole page I’ve put together of multiple blog posts that can direct you and answer questions that you may have. Check it out here!  

Adding in hands-on activities for your early childhood learners can be overwhelming at first, but don’t stress! I am here to help. What qualifies me? I was in the exact same position as you a few years ago. I had the desire to be the #teachermom that pulls out fun, educational activities for my kids, and even followed plenty of people on social media giving me all of the ideas for activities. BUT it seemed absolutely overwhelming to do so. Eventually, I got the hang of it, and now I am in a place where I can walk you through it! Here’s what I did. 

I invested in materials. Typically, these materials are fairly inexpensive and you’ll probably find a lot of them around your home (rice, cooking utensils, paper, markers). But I found the most success when all of the materials were there and ready for me to pull out. I spent around $75 at Amazon, Walmart, and The Dollar Store combined. This is also partially because I didn’t want to share my kitchen materials with my kid’s activities, so I spent a good chunk on new spoons, cups, muffin tins, etc. Having all of the materials together and organized helped tremendously to help me feel like I could be a part of this crafty early childhood educator bandwagon of hands-on activities! 

I lined out the purpose of these activities. Yes, I want my child to have these experiences and learning opportunities. But was I setting up activities for me to sit down and work with my kids one-on-one? Did I need the activities out to keep them entertained while I worked on something else? Yes to all of the above. However, it would take time to achieve the latter. 

I decided to use the sensory bins and activities for one-on-one time and connection with my kids at first, and then eventually use them as something for them to do while I made dinner or worked. I wouldn’t be setting myself up for success by expecting my kids to play independently and keeping expectations of the activities. 

I found the right social media accounts to follow. There are parents and educators out there that have done all of the dirty work for us! You don’t have to carefully create a new activity each time you feel your child needs entertainment or has a skill they need to practice. Others have already done it, and they are on social media! My favorites: Busy Toddler and Days with Gray.

These two stand out to me because they don’t post extravagant activities. It takes minimal set up time, simple materials, and are doable for any parent or educator to put together! Watch out for those social media accounts that are posting above and beyond activities that will make you feel inadequate to carry them out! 

I made a schedule. This was a temporary thing that I didn’t have to do for long, but helped initially. It made it predictable for all of us and gave me a visual of what I could expect. I decided activities in the morning would be 1:1 and done with new activities that needed a lot of supervision. Afternoon activities, while I was cooking dinner, would be independent activities that I knew I could trust my kids alone with. It looked like this: 

Week one: Activities in the morning after breakfast, before nap. 

Monday: bubble foam
Tuesday: rice scoop and transfer
Wednesday: water painting on construction paper
Thursday: Color mixing pour station
Friday: contact paper art

Week two: morning activities for together time, afternoon activities for independent play

Monday morning: moon sand
Tuesday afternoon: water painting on construction paper
Wednesday morning: color mixing pour station
Thursday afternoon: contact paper art
Friday morning: dot sticker line-up/ color match 

Week three: Start trying two activities a day!

Monday morning: moon sand
Monday afternoon: sticky note shape match
Tuesday morning: rice bin scoop and transfer
Wednesday afternoon: water sensory bin
Thursday morning: play dough
Friday afternoon: dot sticker activity 

This isn’t exactly but gives you an idea. Mornings were for working together and learning together. Afternoons were for independent play with materials I could trust my kids with. This schedule didn’t last forever, only about 3-4 weeks. But once I was in the rhythm and knew what to expect more, I didn’t need the schedule as much and slowly tapered off. Eventually pulling out activities became intuitive and I could tell when we needed one, what type it needed to be, and so forth. 

Do what you feel comfortable with. Are you not into playdough or paint? THAT IS OKAY! You can still have success. Just because a teacher or mom on Instagram shows how “easy” and “doable” it is to let children play with slime doesn’t mean you have to do it too. 

My first activities with my daughter were water sensory bins (because all it takes to clean up when it spills is a towel.) and “painting” with water on construction paper. Again, because cleaning up water is mounds easier than cleaning up rice. 

Eventually, all of our water play led to me being more comfortable with dried corn in a sensory bin. Then rice. Then, I let my daughter paint… It was absolutely nerve-wracking, but guess what I learned? The paint can be cleaned up. I can clean it up, and my daughter can learn how to clean when she helps! “Everything can and will be cleaned up.” Now, years later, we paint at least once a week, and I can comfortably leave my 3.5-year-old alone at our kitchen table to play with play-dough. Rome wasn’t built in a day, friends. 

Set you and your kids up for success. This is something that deserves a whole blog post, but I’m going to sum it up in two paragraphs for you. When setting up activities, think ahead. Are you working with paint? Keep a wet rag close by for messes. Maybe today is rice sensory bin day? Don’t put the bin near the fridge, because when it inevitably spills, it will roll under there and you won’t ever want to set up a rice sensory bin again. Also, set your kids up for success. No child was born knowing how to play properly in dried rice and corn, they need boundaries and rules! Keep it simple, but keep them there. 

Don’t add too much rice, don’t give them access to too much paint, or too much water, etc. Use big blankets or dollar store table cloths and shower curtains to protect your floors. And know your exit plan. What will clean up look like? What will your child help with, and what will you take on? Read my whole list of sensory bin tips here.


I know, I know. This post can be just as overwhelming, if not more so than you were before. But take it in baby steps! Figure it out as you go! Your child isn’t looking for the perfectly curated bin with exactly the lessons and skills they need for their current age and stage. 

Your child is looking for an opportunity to play. To spend time with you. To just be a kid. These finite details aren’t here to scare you away or add more to your plate, it’s just a reference guide for when you need help. 

So let’s break it down to basics. 

How do you start a rice sensory bin? Open a bag of rice. Pour contents into a large bin or bowl. Add in a cup and spoon. Sit on the floor with your child and enjoy. 

It really is that simple. So, go play! Go have fun! And go let those kids explore! 

How To Dye Rice For Sensory Bins

Did you catch my post a few weeks ago on how to find success with dyed rice sensory bins? This post will give you tips on rice sensory bins, as well as our favorite tools for rice play. Today, I wanted to share how to make the dyed rice! Here’s my tried and true recipe plus some tips! This rice is taste-safe but does not mean it should be eaten by the handful. 

Materials: 

1 cup dry rice
1 tablespoon vinegar
Lots of food coloring! Liquid or Gel
Sandwich bags
Sheet pan
Wax paper/ parchment paper/ tin foil (optional but nice to have) 

Instructions: 

Place the rice and vinegar in a plastic sandwich bag. Squirt in lots of food coloring. The more food coloring, the deeper and better the color will turn out. 

Sandwich bag with rice, vinegar, and food coloring

Shake the bag until the coloring is evenly spread through the rice! 

Spread the rice on a sheet pan to dry. I like to cover my pan with parchment paper (or something similar) to keep the pan cleaner. If this isn’t possible, it’s fine to place the rice directly on the pan. In my experience, it has always washed off with a little soap and water 

Dump the rice on a sheet pan
Spread it thin. This is one cup of rice on one half of a standard size cookie sheet.

*The thinner you spread the rice, the faster it will dry. 

*For an even faster dry time, put in the oven on the lowest setting. If it’s a sunny day, place outside to dry. 

After about 30 minutes, you will have to break up chunks of rice that stick together.

The rice is dry once you can run your fingers through it and it doesn’t leave a residue of color on your fingers. 

Other Tips: 

Use the 1:1 ratio for rice and vinegar. You can do 2 cups of rice, 2 Tbs vinegar, and so on… 

The sandwich bag is a great way for kids to get involved in making the rice, they do great at mixing up the color into the rice! 

HOWEVER, we’ve had our fair share of little fingers puncture the ziplock bag, sending rice everywhere and food coloring places you don’t want. Teach your kids to mix the bag with flat hands and rub, like this!

If you’re looking to use less plastic, a glass bowl and spoon work great to mix as well. Make sure to rinse and dry the bowl and spoon before starting another color so you don’t mix colors.

Store in a gallon Ziploc bag or tupperware container. 

The rice smells strongly of vinegar for a time. Leave the baggie or container open all day or through the night to get rid of the smell before sealing and storing. Once the vinegar smell goes away, I have never found the strong smell to come back.

The rice can last for years and years stored in an airtight container!

Rice Sensory Bin Tips

Hello, early educators and parents of littles who are ready to dive deep into the sensory bin world! Sensory bins can be daunting given the mess that can come with it. But I’m here to help ease your fears and bring more sensory play into the world. First, a few other resources for articles: 

One Big List Of Sensory Bin Fillers

Tips For Sensory Play In General

Here are my tips specifically for RICE sensory bins. 

SET BOUNDARIES: Before you even begin, set boundaries. Our number one rule is to keep the rice and tools inside the bin. This idea of rice in a bin to play with can be new for the majority of kids and we can’t just assume they know to keep the rice nicely in the bin. Give them good boundaries BEFORE you give them the materials. 

SET THEM UP FOR SUCCESS: One thing I firmly believe is that we have to set kids up for success before we expect them to perform the way we want and expect them to. Even if you set them up for success, accidents still happen. The best solution I have found for keeping rice contained is to put the sensory bin on top of a quilt or rug. Then it can easily be shaken off outside or vacuumed up when you’re done!

KEEP THE BOUNDARIES: When lines are crossed, don’t be afraid to take a break from the rice. Separate the child and the bin however you can, take a minute for a break, and come back to try again for success when you feel the child is ready. 

FIND THE RIGHT TOOLS: Too many tools, not enough tools, or the wrong tools can make or break the sensory bin experience. We’ve done our fair share of experimenting with tools and here are our favorites. 

  1. Scoops and spoons 
  2. Small bowls 
  3. Ice cube trays
  4. Small people or animals for pretend play 
  5. Holiday-themed toys (usually from the dollar store) 
  6. Puzzle pieces for a puzzle find. Expect this to be messier because they’ll be pulling pieces out of the bin. 

PRAISE THE POSITIVE: Applaud and praise the correct behaviors. 
“I love how you’re sharing so nicely with your friend!” 
“You are keeping the rice in the bin so well. I am proud of you!”  

TASTE SAFE IS NOT AN AFTERNOON SNACK: Dyed rice is typically made taste safe (recipe coming soon!). Just because it’s taste safe doesn’t mean it should be eaten. It means you don’t need to call poison control if it ends up in their mouth at some point. With diligent supervision and boundary setting, babies as young as a year old can play with sensory bins full of rice. More on that in the next point. 

The first experience of a sensory bin looks like sitting right next to the child, helping them scoop and play. When rice is inevitably put in their mouth respond with, “Yucky! No no!” and help them spit it out. Repeat over and over. It takes multiple times to remind them and in multiple settings! Be diligent and they’ll understand. Take it away if you need to. 

IT TAKES TIME FOR RICE TO BE AN INDEPENDENT ACTIVITY: To go along with the last point, it takes time for any sensory bin to be an independent activity! If you’re a parent, handing your child a rice bin with toys and tools for the first time so you can make dinner isn’t setting them up for success. Rice bins are a side-by-side activity to teach your child self-control and pretend play. 

In an early childhood educational setting- model, model, MODEL how to play with any sensory activity. Set a responsible adult next to the bin with a handful of kids to monitor and keep the boundaries. 

Given time, independent play with rice is possible! 

Do you have any tips for rice sensory play you can add to this list? 

#TeacherMom Struggles: What’s The Balance?

The other day I handed my 2.5-year-old scissors for the first time in her life. When handing them to her, I had a moment where I realized this was probably her first physical exposure with scissors herself instead of watching me use them, so I gave her a quick tutorial on how to hold them. 

Within minutes she was frustrated. She didn’t know how to cut the paper I had given her. I originally started her on this project so I could have a few minutes to cook dinner, so you can imagine my frustration when I had to go back over to show her, yet again!, how to hold and use the scissors. She worked diligently, and very, very slowly on cutting up a big sheet of construction paper into tiny pieces, struggling and asking for help the whole way. 

Once she had completed the construction paper, she moved on to the next task without consulting me first. The blanket. Luckily, we have some fairly dull kid scissors that won’t cut up the fabric so the blanket was saved, yet it still wasn’t okay. 

But it made me think that if I were teaching in a preschool, kinder, or first-grade classroom (maybe even older) and we pulled out scissors for the first time in a while, I would have an explicit lesson about what is okay to cut, scissor safety, and more. Yet with my daughter, I didn’t! A couple of thoughts I had about this situation-

  • Using scissors seems like such an every day, easy task to us who have used them for years and years. This is absolutely not the case with a toddler. 
  • Explicit instruction can do wonders. 
  • New activities such as using scissors aren’t for “from a distant” parenting. I should have chosen a safer activity I knew she could be successful and handle on her own. 
  • I try to turn off “teacher mode” often around her because while it’s valuable, I want to be play focused and not “coach” her too much throughout our day. But sometimes, teacher mode is okay and should come out. 

Mistakes were made! The first time a child picks up scissors they don’t need a quick tutorial, they need a sit-down, explicit lesson! I know that. I guess as a #teachermom, I expected myself to have a perfect balance of teacher mind and mom mind, and while it seems to work out some days, it doesn’t others. So here’s to me working hard at this balancing act of #teachermom life! 

You #teacherparents out there, do you struggle with finding a balance between being a parent and being a teacher to your kids?