

Whether you are beginning the PYP Exhibition or otherwise would like to recharge your students’ teamwork skills, this week’s provocation centers on collaboration.
High expectation, clear collaboration with intention, and active coaching! Love the wisdom from @mssackstein at @masscue #maleads17 #edtech pic.twitter.com/4wAMPFOk4L
— Caitlin E. Krause (@MindWise_CK) March 10, 2017
One word of caution however: spend more time “coaching from the side” than you do lecturing from the start. Chances are, they’ve heard it all before, and they need hands-on, timely feedback more than anything! (I’ve definitely gotten this all backward in the past, giving far too much time and energy to the initial instruction and then expecting them to put it into practice effectively).
Resource #1: “They All Saw A Cat” by Brendan Wenzel


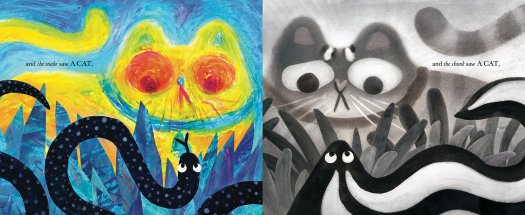

Both the advantage and disadvantage of collaboration lies in the fact that we all have different perspectives. Enter “They All Saw A Cat” to get kids thinking about what this means.
Resource #2: 21 Balançoires (21 Swings) by Daily tous les jours
Every time I watch this, I keep forgetting that the background music was not, in fact, a professional soundtrack, but was created by these people simply cooperating with one another on the swings. Sure to evoke serious thought from your students!
Provocation Questions:
- Why does perspective matter when it comes to collaboration?
- What makes collaboration work?
- How has the need for collaboration changed over history?
featured image: DeathToTheStockPhoto


